Showing posts with label on. Show all posts

Sunday, October 26, 2014

Repair IMEI on Samsung Galaxy Star GT S5280 Without software box just root

Hello my imei corrupted on my GT-S5280 and i discovered a way to put it back on place without box or any kind of software this is what i did:

1- rooted the phone with Cydia impactor Cydia Impactor
2- installed super user
3-went to play store and installed FX FILE EXPLORER and FX FILE EXPLORER ROOT ADD-ON
4-Open Fx file expoler and chosed System (Root)
5-Opened EFS folder , and inside theres a folder named IMEI
6-Open folder named Imei , and inside theres a file named imeino1
7-Open file named imeino1 , for that just click it and choose text editor
8-Now you will see your imei corrupted or no imei at all , if you see your corrupted imei delet it and put the imei you got from the back of your phone, if theres no imei at all just put the imei you got from the back of your phone
9-Hit save
10- reboot and dial *#06# and see your imei repaired

dont know if this method works on GT-S5282 if someone can test please report as the s5282 have two imei maybe theres two files to edit please report

Sunday, September 28, 2014

Nokia 111 No Power On with Battery Problem Solution

1-Nokia 111 is not getting power on with battery.
2-Nokia 111 is dead and not getting power on with battery.
3-But it can be switch on with direct power supply of 4v.
Nokia 5250 LCD Display problem Ic Solutions


Tools:-
To solve this problem you should have
1-Any electronics cleaner.
2-Hot Air Machine.
3-Solding Iron.
4-And same mother board if a few components required.
Solution:-
1-Check Nokia 111 with new battery and try to switch on.
2-If it can not be power on with battery then check with Power Supply.
3-Disassamble Nokia 111 and look at mother board very carefully.
4-If there is some rust or carbon on board then clean it with electronics cleaner.
5-Apply hot air with Hot air gun. Here should not be much heat because it can harm you and Mobile
Phone.
6-Check Mobile phone with battery if it can be power on with it.
7-If not working with above process then change these parts as shown in above diagram.
Warnings:-
1-Do not apply to much heat it can be harm for your skin and mobile.
2-Do not apply to much cleaner it can be cause of rust or carbon if you do not make your phone dry.
for more detail and new tips and tricks about cellphone service problem keep visiting this page we will update cellphone service diagrams timely with new cellphone diagrams.some related post are also given bellow you can read them also for more information about cellphone.

Wednesday, August 27, 2014

Saturday, August 9, 2014

How to Install Recovery on Huawei Ascend P1 U9200 B113 and B115

Huawei U9200 AKA Ascend P1


Try this at your own risk, I am NOT responsible if you brick your phone.

This is mainly for Huawei Ascend P1 U9200 with B113 or B115 firmware but will work on any version with the right recovery image :) 


Step 1 - Download Android Control here (mirror) or here (XDA thread) and extract to a folder on your hard drive root (eg. c:AndroidControl)

Step 2 - Download one of these Recovery images -
recovery-new.img (the one included in Onekey)
or
recovery-off.img (the one that Onekey is based on)
or
cwm_touch_recovery_viva_beta.img (A new one which is in English :)

Note: As far as I know, the first two are both Chinese language but based on ClockWorkMod so should be easy enough to navigate around, the last one is a beta but is in English and uses the touchcreen to navigate rather than the volume and power keys :)

Step 3 - Put whichever image you choose into the AndroidControl folder ready to be flashed over.

Step 4 - Make sure USB Debugging is enabled on your phone and then switch it off. Hold volume down and power key (I think lol) to boot into download mode (phone should boot to logo and then stop) then plug it into your PC.

Step 5 - Open a command prompt and navigate to your Android Control folder, run the following command depending which one you chose.


fastboot flash recovery recovery-new.img

or

fastboot flash recovery recovery-off.img


or


fastboot flash recovery cwm_touch_recovery_viva_beta.img


Step 6 -  Once finished type - fastboot reboot to reboot your phone.

Step 7 - Turn off your phone once rebooted and then hold the volume up and power keys to boot into recovery.

Enjoy :)

Thursday, June 12, 2014

Nokia Asha 200 Power Button On Off Switch Not Working Problem

if you have a Nokia Asha 200 dead they may can have a power switch on off problem so please in first step plug in a charger and if Nokia Asha 200 is charging proper and well but not getting on it means the main problem can be power switch on off fault.Nokia 1200 1208 Light Problem Solution with Jumpers 100% tested Without IC

so for this you have to change power switch button on off button in Nokia Asha 200 if prints are also damge in Nokia Asha 200 for on off button then here is a full path and track for power switch button in diagram that is attached with this post so check all this path and track for power switch on off button in Nokia Asha 200 and if any of these links broken than make these jumpers as shown in diagram with red line while blue color is indicated for ground print.
for more detail and new tips and tricks about this problem keep visiting this page we will update it timely with new diagrams.some related post are also given bellow you can read them also for more information.

Wednesday, March 19, 2014

How to Install CyanogenMod 10 Android 4 1 Jelly Bean ROM on Samsung Galaxy S Duos S7562

In this tutorial we will guide you step-by-step on how to install CyanogenMod 10 Android 4.1 Jelly Bean ROM on Samsung Galaxy S Duos S7562.
CyanogenMod 10 Android v4.1 Jelly Bean provides an immense exhilaration to those users desiring to enjoy the features of Jelly Bean 4.1 ROM. CyanogenMod, also known as simply CM, is undoubtedly the most greatly acknowledged unauthorized Android firmware, and day-by-day they are increasing their compatibility with numerous old and freshly arriving Android devices from different manufacturers, including our Samsung Galaxy S Duos S7562. Many reviews show that CyanogenMod provides much more facilities than the official Android firmware. Installing CyanogenMod 10 Android 4.1 Jelly Bean on your Samsung Galaxy S Duos S7562 will enable its user to sustain in the Jelly Bean environment.
So in this tutorial we will be showing you an installation guide regarding using CyanogenMod 10 Jelly Bean 4.1 ROM on Samsung Galaxy S Duos S7562. Just follow the simple steps given below:

Disclaimer

This tutorial will definitely work when using Samsung Galaxy S Duos S7562 only. While working of it on others is not yet confirmed. On applying this installation to another model or device may give an unwanted result. While applying this update we will not be responsible if anything occurs to your device, so continue at your own risk.

Pre-Requisite

  1. For successful completion of this rooting process charge your phone up to a minimum of 75% battery.
  2. You must take a back-up of all your personnel items and other impotent data, such as Call Logs, SMS, Contacts, Audios, Images, Videos, APN (Access Point Names) settings, Bookmarks, MMS settings, on your phone.
  3. One must install a custom recovery image particularly for his Android device. To do this, ClockworkMod Recovery should be downloaded using the Internet.
  4. If you have not, then you must unlock your Android device’s Bootloader. But due to unlocking of Bootloader, your Android device may lose its official Warranty. So to overcome this, download fastboot from Internet.

Steps for installing CM10 Android 4.1 Jelly Bean ROM for Samsung Galaxy S Duos S7562

Step 1
From your Android device disconnect & remove the memory card and insert it in your Computer using a card reader. You must not use USB cable, since CyanogenMod do not work properly through USBs.
Step 2
Now do repartition of memory card, by just doing right click on the existing partition, choose Resize option, and then apply the sufficient amount of space towards your new partition. Make your new partition as your primary partition of Ext4 file system. Press the Apply option & remove your memory card now.
Step 3
Using the Internet, download: CM10 Android 4.1 Jelly Bean ROM for Samsung Galaxy S Duos S7562.zip file and Google Apps in your Computer. Again reinsert it in the PC and then copy the above downloaded zip file in a folder named as “root” under your SD Card. Don’t run or try to open this file, just copy it in the folder.
Step 4
Now, remove your memory card from the Computer. Then shut-down your Android smartphone and then again insert back memory card in the phone.
Step 5
Now, enter into the Recovery Mode. For this just press the Down Volume & Home button simultaneously, and while pressing these buttons press down your Power button at the same time.
Step 6
Since you are now in the Recovery Mode, select the install zip from SD card” option, and then select the choose zip from SD card” option to browse into your SD Card. Now, navigate up to the downloaded CM10 Android 4.1 Jelly Bean ROM for Samsung Galaxy S Duos S7562.zip file for flashing it on your phone.
Step 7
Now get yourself back to the main menu by pressing back button and then reboot your Android phone.
Step 8
After this, you’ll have CyanogenMod 10 ROM installed over your Samsung Galaxy S Duos S7562.
Finished!
————————————————————————————————————————————————–
Update: The link for downloading CyanogenMod 10 ROM has been removed from this tutorial as it had become a ‘dead link’  after sometime(as reported by many of our site readers!). Keep checking back our site as we will soon be updating the new working link for downloading the ROM.

Sunday, March 16, 2014

Solution 90 Galaxy S duos S7562 shutdown on sleep mode or soudently dead

Hi guys .
this is another tested Solution for you!! have fun! and make £££
this one is for S7562 whichs soudentely dead or shutdown on sleep mode ( stanby mode ) , mainly it is due to Wifi , at least what I got in hands .
so this is how I solved mines , about 3 phones. but after that say bye bye wifi .

Thursday, March 13, 2014

How to Restore stock Firmware on Huawei Ascend P1 U9200

Huawei Ascend P1 - U9200


WARNING - This will completely reset your phone and erase all data, custom rom and any custom recovery partition you have installed such as ClockWorkMod and replace it with Huawei Stock recovery etc. It will also remove any rooting on the phone and restore it to its unrooted state.


Method 1 – Forced Update


Step 1 - BACKUP everything on your phone.


Step 2 - Download the stock firmware


(These are the only ones I have available at the moment so you might need to pick the closest match for yours)

* - This may or may not be the correct country, Ive had to guess with some of the firmwares so if not it will probably be close or a general/normal version.


Step 3 – Download all parts of the firmware into the same folder.


Step 4 - Open one of the downloaded .rar files in WinRAR or other archive manager.


Step 5 - Select the dload folder inside the main folder and drag it onto your desktop.


Step 6 - Open the dload folder on your desktop and check that the file update.app is inside.


Step 7 - Copy the whole dload folder accross to the root of your phones SD card (you may want to use a blank SD for this)


Step 8 - Turn your phone off then press and hold the volume up and volume down keys together and then press the power key.


Step 9 - The install process should start automatically so just wait until its finished.


Step 10 - Your phone will reboot automatically after the firmware has finished installing and will take some time to load, this is normal so just leave it to do its thing.
Step 11 – Check that the update has worked by checking the Firmware version by navigating to - Setting->About phone->Build number


Note: The [Firmware Version] should match the last 7 characters of the firmware you downloaded eg C00B213.
Method 2 – Normal Update


Step 1 - BACKUP everything on your phone, I cannot stress this enough :)


Step 2 - Download the stock firmware


(These are the only ones I have available at the moment so you might need to pick the closest match for yours)

* - This may or may not be the correct country, Ive had to guess with some of the firmwares so if not it will probably be close or a general/normal version.


Step 3 – Download all parts of the firmware into the same folder.


Step 4 - Open one of the downloaded .rar files in WinRAR or other archive manager.


Step 5 - Select the dload folder inside the main folder and drag it onto your desktop.


Step 6 - Open the dload folder on your desktop and check that the file update.app is inside.


Step 7 - Copy the whole dload folder accross to the root of your phones SD card (you may want to use a blank SD for this)

Step 8– If your phone is on, switch it off and then back on again. Otherwise switch on your phone and wait for it to boot up fully. Navigate to Settings->Storage->Software Upgrade->SD card Upgrade->Confirm->Upgrade
You should then see the following - 


Step 9 – Check that the update has worked by checking the Firmware version by navigating to - Setting->About phone->Build number


Note: The [Firmware Version] should match the last 7 characters of the firmware you downloaded eg C00B213.

Done, you should now have a phone thats back to factory fresh :)

Friday, February 14, 2014

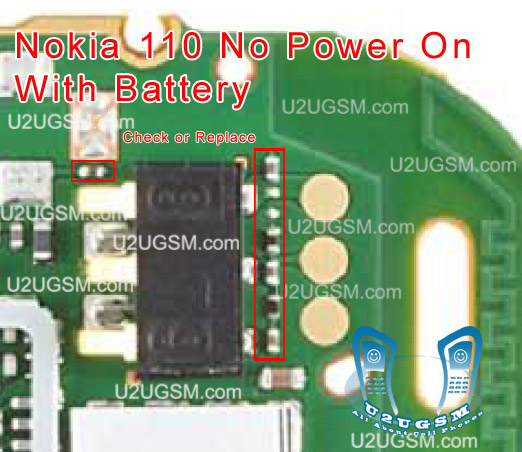
Nokia 110 No Power On with Battery Problem Solution

1-Nokia 110 is not getting power on with battery.
2-Nokia 110 is dead and not getting power on with battery.
3-But it can be switch on with direct power suplly of 4v.
Nokia 5250 Keypad Not Working Jumper Problem Solution


Tools:-
To solve this problem you should have
1-Any electronics cleaner.
2-Hot Air Machine.
3-Solding Iron.
4-And same mother board if a few components required.
Solution:-
1-Check Nokia 110 with new battery and try to switch on.
2-If it can not be power on with battery then check with Power Supplu.
3-Disassamble Nokia 110 and look at mother board very carefully.
4-If there is some rust or carbon on board then clean it with electronics cleaner.
5-Apply hot air with Hot air gun. Here should not be much heat because it can harm you and Mobile
Phone.
6-Check Mobile phone with battery if it can be power on with it.
7-If not working with above process then change these parts as shown in above diagram.
Warnings:-
1-Do not apply to much heat it can be harm for your skin and mobile.
2-Do not apply to much cleaner it can be cause of rust or carbon if you do not make your phone dry.
for more detail and new tips and tricks about cellphone service problem keep visiting this page we will update cellphone service diagrams timely with new cellphone diagrams.some related post are also given bellow you can read them also for more information about cellphone.